What are they good for?
What are they good for?
They’re good for detailed explanations, structured outputs, and sensitive industries.
How much do they cost?
How much do they cost?
Credits charged per 1,000 tokens processed if you do not connect your AWS Bedrock account.
What native files can they process?
What native files can they process?
Anthropic models can process each of the following files:
- .jpg
- .jpeg
- .png
- .webp
- .gif
Setting Up AWS Bedrock with Relevance
Relevance supports two secure methods for connecting your AWS Bedrock account to access Anthropic models. Choose the option that best fits your organization’s security requirements.Key Benefits
Cross-Region Inference: Ensure that you pick a model that has cross region inferencing available. Usage Oversight: Both setup methods provide access to all supported Anthropic Claude models available in your selected AWS regions. You will be able to have increased cost control and insight into model usage.Option 1: IAM Credentials (Quick Setup)
Best for: Testing, proof-of-concepts, and organizations with flexible security policies.Prerequisites
- AWS account with Anthropic models enabled in Bedrock
- Administrative access to create IAM users and policies
Setup Steps
2. Create IAM user
- Create a new IAM user in your AWS account
- Attach the policy created in step 1
- Generate access keys for this user
Option 2: Role Assumption (Enterprise Security)
Best for: Enterprise organisations requiring enhanced security, short-lived credentials, and detailed usage tracking.Prerequisites
- Enterprise Relevance plan
- AWS account with Anthropic models enabled in Bedrock
- Administrative access to create IAM roles and policies
1. Contact your account team
Reach out to your Relevance Account Executive to initiate the role assumption setup. They will coordinate with our implementation team to exchange the necessary account details.
3. Create and attach permissions policy
Create a policy with Bedrock permissions and attach it to your role:
If you run into any issues with either of these options, please reach out to your Account Executive or our support team.
AWS Bedrock Guardrails (Optional)
You can optionally configure AWS Bedrock Guardrails to apply content filtering and safety controls to your model invocations. Guardrails allow you to implement safeguards for your generative AI applications.Prerequisites
Before configuring guardrails in Relevance AI, you must:- Create a guardrail in AWS Bedrock console
- Note the Guardrail ID or ARN
- Optionally note the specific version you want to use
- Enable Cross-region inferencing on the guardrail
For instructions on creating guardrails, see the AWS Bedrock Guardrails documentation.
Configuration
In the Relevance AI dashboard under Project Settings > API Keys, add the following:| Key Name | Value | Required |
|---|---|---|
| AWS Bedrock Guardrail Identifier | Your guardrail ID or ARN | Yes (if using guardrails) |
| AWS Bedrock Guardrail Version | Version number (e.g., “1”) | No (defaults to DRAFT if you don’t have versions) |
IAM Policy Update
If you’re using guardrails, add the following permission to your IAM policy:Important considerations
Multi-Region Support
For optimal performance and availability, ensure your AWS policies include permissions for multiple regions. Use* in the region field or explicitly list all regions where you want Bedrock access.
Model Availability
Different Claude models are available in different AWS regions. Verify model availability in your chosen region using the AWS Bedrock documentation.Security Precedence
If both IAM credentials and role ARN are configured, Relevance will automatically use the more secure role assumption method.Additional Resources
- AWS Bedrock Inference Profiles Prerequisites
- Cross-Region Inference Documentation
- Supported Models by Region
Accessing Claude models using Vertex AI on Google Cloud Platform
If you use Google Cloud Platform, you can connect your Vertex AI API key to Relevance AI, which will allow you to use your Google Cloud Platform credits as opposed to your Relevance AI credits for Claude models. You can do this by following these steps:Enable your Vertex AI API key
In Google Cloud Console, enable the Vertex AI API by following the instructions here.
Enable the Claude models you wish to access
Enable the Claude model you want to use via https://cloud.google.com/vertex-ai/generative-ai/docs/partner-models/claude (click on the model card, then Enable)
Create a service account
Create a service account in the Google Cloud Console following the instructions at https://cloud.google.com/iam/docs/service-accounts-create. Make note of the project ID used to create the account. The service account can have any name and description desired.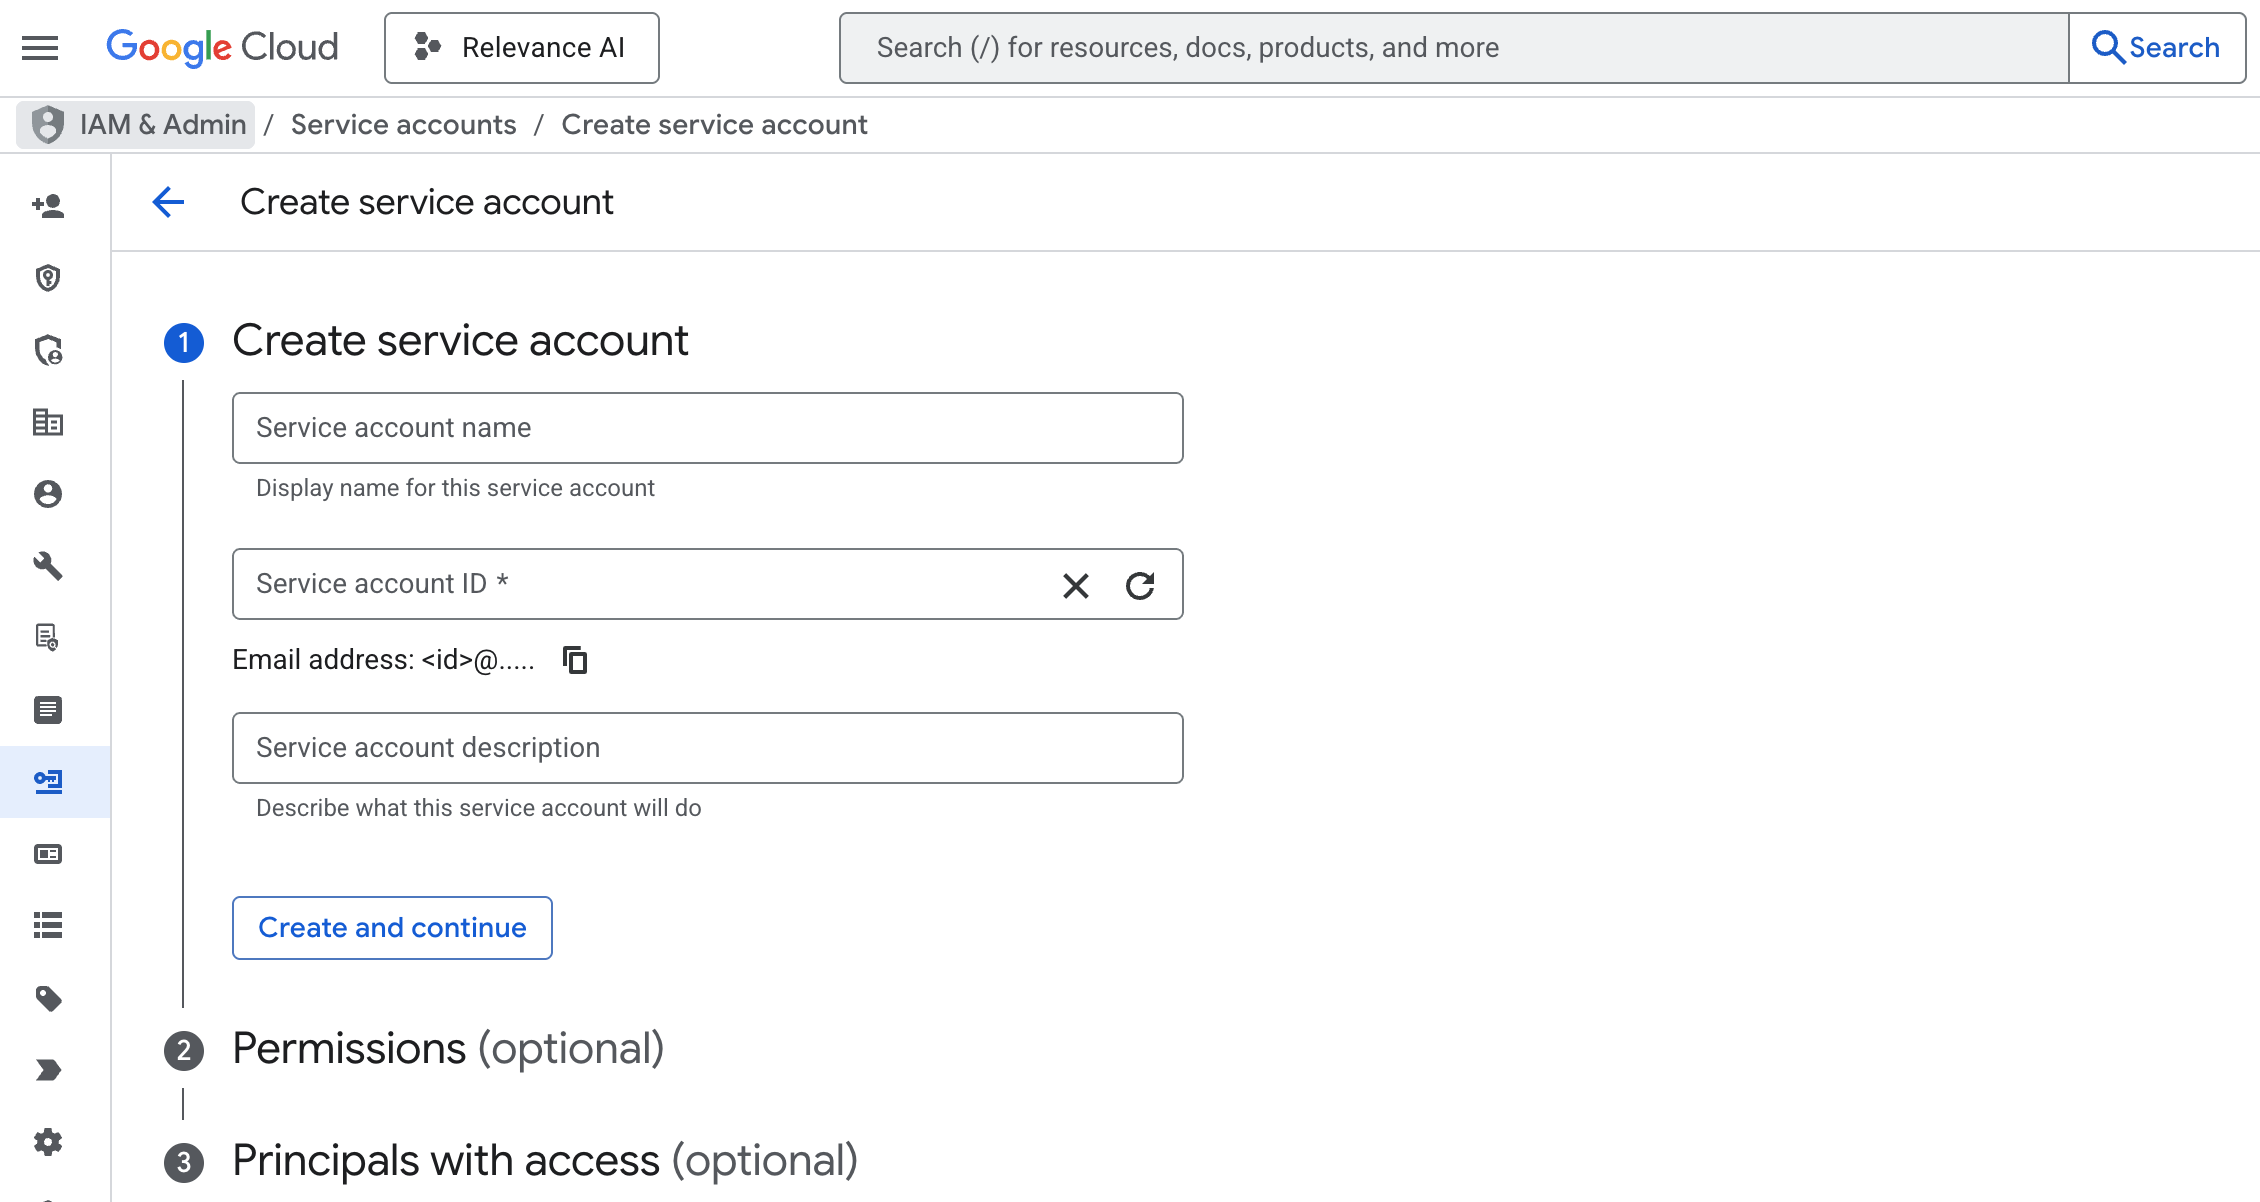
Add IAM role
Give the service account the Vertex AI Service Agent IAM role. This means the service account is permitted to use Vertex AI and call LLMs in Google Cloud.
Extract the client_email and private_key fields
In the key file, extract the client_email and private_key fields exactly as they are written, removing the quotation marks.The client_email should be an email address that normally ends with iam.gserviceaccount.com.The private_key should be formatted as follows:
gcp-vertexai group of models.